Don't you hate searching for things?
How to change OXYGEN cylinders.
Things to first consider:
1) Gas cylinders are reasonably heavy and will be manually moved by hand. Do not attempt this if you are unsure of physical ability.
2) Care must be taken not to drop or strike cylinders against any object, or other cylinders.
3) Always ensure there is a clear path yourself and cylinder when moving any cylinders.
4) All connections must be firmly tightened by hand only.
5) Always check for leaks by listening for sound of gases, during and after fitting.
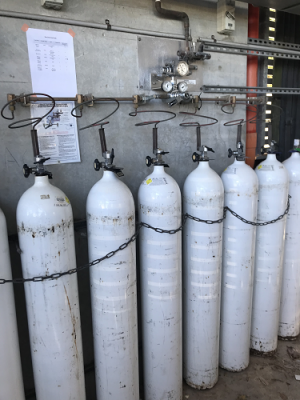
There are 3 gauges, 1 lever, and 6 oxygen bottles connected. There is 2 goups of 3 oxygen cylinders - Left and right banks.
TOP GAUGE INDICATES OVERALL SYSTEM PRESSURE. LEFT GAUGE INDICATES LEFT BANK (GROUP) PRESSURE OF 3 CYLINDERS ON THE LEFT SIDE
RIGHT GAUGE INDICATES RIGHT BANK (GROUP) PRESSURE OF 3 CYLINDERS ON THE RIGHT SIDE. THE LEVER MOVES LEFT OR RIGHT TO SELECT EITHER LEFT OR RIGHT CYLINDER BANK (GROUP)
NOTE: AFTER CONNECTION ALL GAS BOTTLE VALVES - BOTH SETS OF 3 BOTTLES MUST BE SET OPEN
Images below are of the oxygen gas manifold.

First and last thing to do is check gauges pressure reading, to determine which bank is empty Take note of pressure gauge reading before and after changing cylinders.
Below central gauge, there is another pressure gage below and slightly left and right of it. Image above shows lower left gage for left bank is empty, and requires changing cylinders.
If a gauge reads zero, or close to zero, it means the cylinders connected to the gauge are empty. If gauge on left is zero change left group of 3 cylinders. If gage on right is zero change right group of 3 cylinders. Only 1 gauge should be at or close to zero. The other gauge (group of 3 cylinders should be full, or well above the zero point.
After determining correct group
Grasp the lever and move either left or right so the bottom of the lever is pointing to the full group of 3 cylinders.
The 3 cylinders that are empty can now be changed. Remove chain that is around cylinders that will be changed.
Turn the knob at top of each of the 3 empty cylinders clockwise until it stops. This is closed position.
After closing off the cylinders grasp black plastic small handle at top of cylinder were pipe work joins the cylinder. Turn it counter clockwise about 5 times, until pipework that connects the cylinder can be lifted up and off the cylinder. Do this for each of the 3 cylinders that are empty.
Once disconnected hold top of cylinder and gentle tilt towards you, to enable rolling the cylinder on it's bottom edge, out of its current position and set aside.
Find 3 full cylinders. Full cylinders will have a plastic wrap cover on the top valve.
Move 3 cylinders one at a time, to same location that the empties were removed from.
Remove plastic wrap from each of the 3 new full cylinders and connect pipework to top of each full cylinder - ie. Reverse the removal
process. Be sure to line up holes on cylinder valve connection with pipework connection.
Turn and tighten black tab handle to tighten connection.
Once all 3 full bottles are connected, slowly open valve knob at top of each of the 3 cylinders that were just connected, by turning knob counter-clockwise. You should see a change of pressure reading on the gauge.
Listen for leakage of oxygen. If there is a leak heard, close the valve on top of leaking cylinder.
Place chain around the cylinders, and lock gas shed gate.